HPC container guide
Introduction
These guidelines offer general principles and specific examples for containerizing scientific applications that are utilized in high-performance computing (HPC) clusters. This approach is different from containerizing network applications that are typically used in cloud environments. We assume that the reader has a basic understanding of the Linux operating system, shell scripting, and the processes involved in building, installing, and packaging software on Linux.
A scientific application is composed of the application itself along with its necessary dependencies. We assume that the application is equipped with a command-line interface, which allows users to execute it through command-line commands. Our focus is on a typical scientific application that processes input data from a disk and outputs data back to a disk. Such an application may operate as an interactive application or be executed as a batch job. For the installation of the application, we assume that it is developed using a version control system, such as Git, adheres to a systematic versioning scheme, and that its source code is hosted online with software releases readily available on the web to facilitate programmatic installation.
Apptainer is the primary technology used to run and build containers specifically designed for HPC clusters. This technology was formerly known as Singularity, but it was renamed Apptainer when it became part of the Linux Foundation, which is an organization that supports the growth of open-source projects. Sylabs, a company that focuses on container technology, maintains a fork of the original Singularity project called SingularityCE. This version has minor implementation differences compared to Apptainer, which may affect certain functionalities or performance aspects. The command-line interfaces of Apptainer and Singularity are quite similar, allowing users to use them interchangeably without significant changes to their workflow. Additionally, Docker is a popular tool that can be used to build Docker containers, while Podman is another tool that can be used to build Open Container Initiative (OCI) containers. These OCI containers can be run on HPC clusters using Apptainer, providing flexibility in container management.
We build our work on top of the excellent Apptainer documentation, which provides comprehensive guidance for users. We also draw inspiration from Octave’s dockerfiles, which offer great examples of HPC-compatible containers tailored for complex scientific applications.
Containerized application
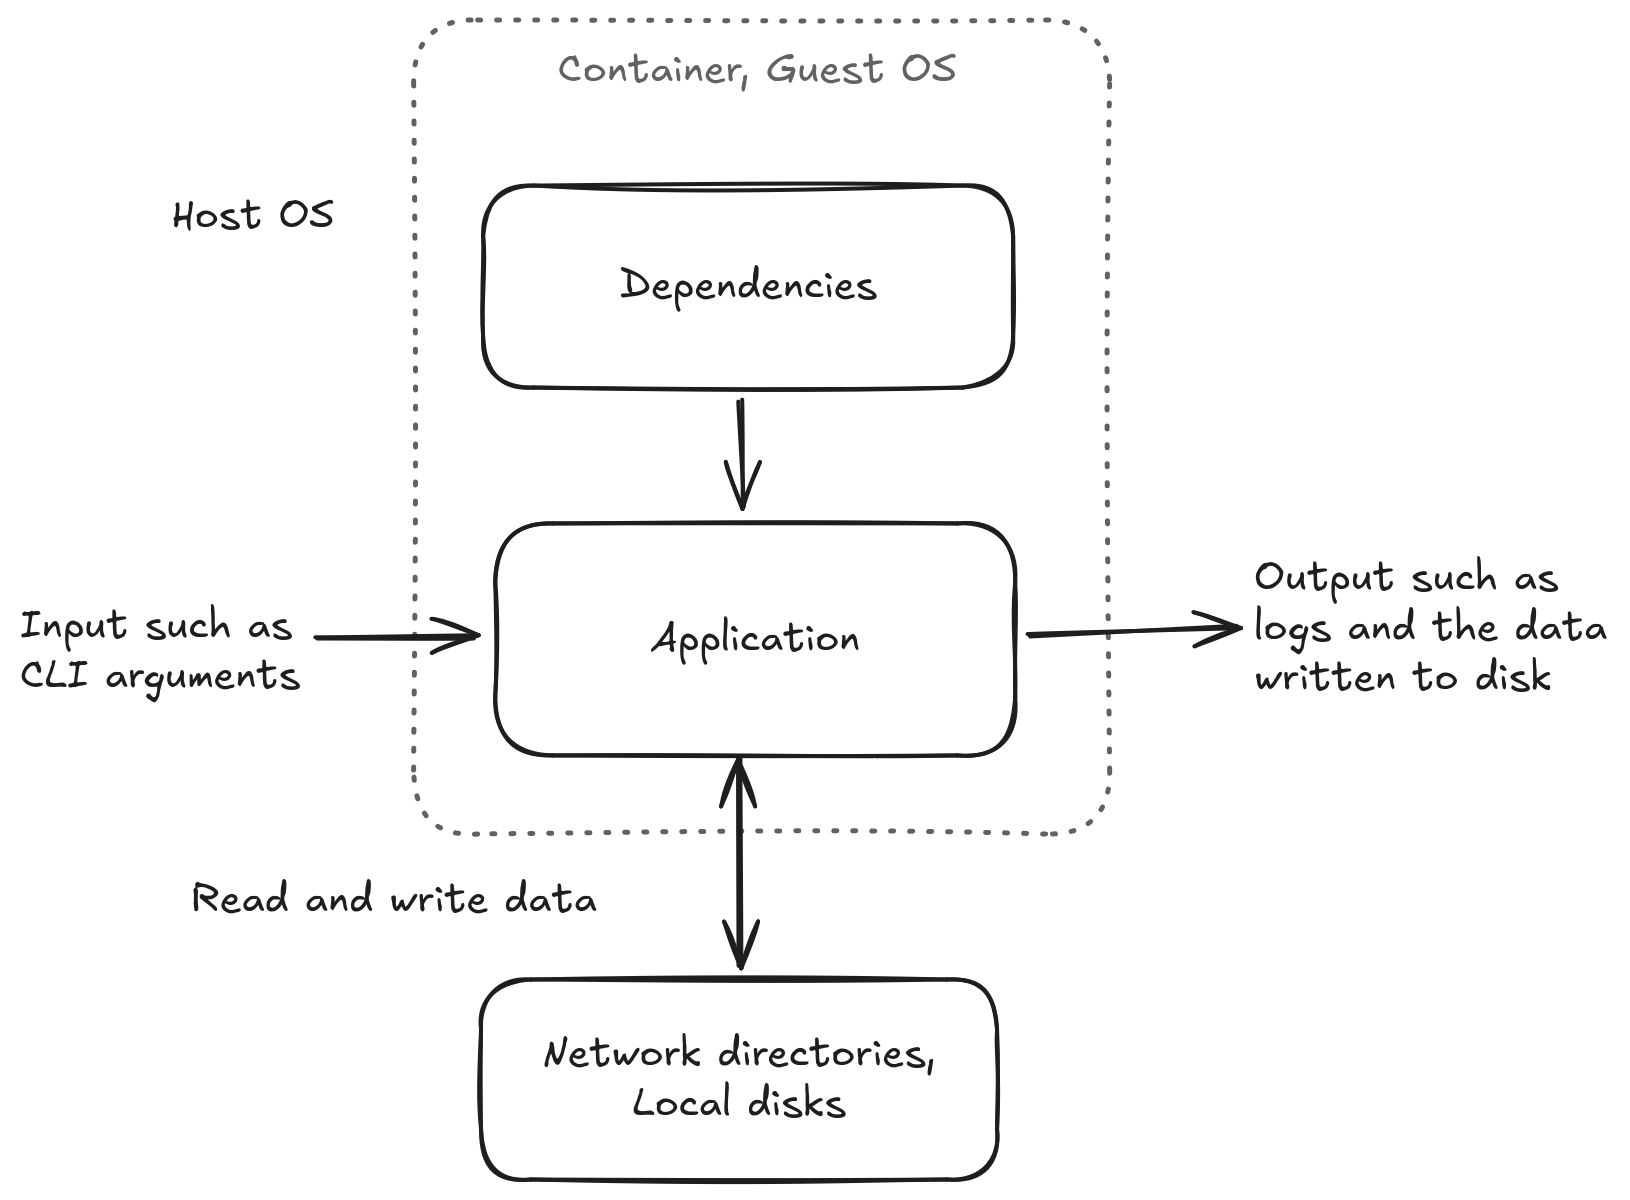
The figure above illustrates a scientific application along with its dependencies. When running software without a container, the application is typically installed in a user directory, and its dependencies may originate from either system or user-installed locations.
The dashed line in the illustration indicates the components that are “containerized” when using a software container. In this setup, both the application and its dependencies are installed within the container. Directories that reside outside the container, such as network directories and local disks, must be bind-mounted to the container to ensure they are accessible from within the container. Containerized software is executed using a container runtime, such as Apptainer or Singularity. It is possible for the host operating system and the guest operating system within the container to be different.
Reasons to use containers on HPC clusters
Using containers on HPC clusters improves portability, consistency, reproducibility, and dependency management of scientific applications. By packaging applications and their dependencies, containers ensure consistent execution across different environments, reducing “works on my machine” issues and facilitating the movement of workloads between systems. This containerization approach greatly enhances reproducibility in scientific research, allowing researchers to share exact experimental environments and replicate results more easily. Additionally, containers effectively manage dependencies by encapsulating all necessary libraries, eliminating conflicts between software versions or incompatible libraries. This is particularly beneficial in multi-user HPC environments where diverse software requirements are common.
Containers also reduce the load on the parallel file system on HPC clusters. Apptainer encapsulates entire software environments into a single, compressed file, drastically reducing the number of files and disk space used on the parallel file system. Also, loading a single large file requires fewer file system operations, leading to faster startup times and less burden on the parallel file system.
General principles
We break down containerization into three acticities:
- Defining and building containers of scientific applications for HPC clusters.
- Running scientific applications from containers on HPC clusters.
- Managing container definitions, images and build processes.
We will discuss the general principles and provide concrete examples for each of these activities.
Defining and building containers
We define containers using definition files. Container definitions should explicitly define all software dependencies to ensure reproducibility.
| Base image | Package manager |
|---|---|
| ubuntu | APT |
| debian | APT |
| opensuse/leap | Zypper |
| rockylinux | DNF |
| centos | DNF |
| almalinux | DNF |
| redhat/ubi8 | DNF |
| redhat/ubi9 | DNF |
| E4S | Spack, APT |
The table below contains recommendations for keeping containers simple, extensible, and compatible with Apptainer, Docker, and OCI containers. We can define containers for Docker and Podman using the Dockerfile format.
| Apptainer | Dockerfile | Recommendation |
|---|---|---|
.def |
.dockerfile |
File extension to use for the definition file. A plain Dockerfile is not always sufficient as complex applications may require multiple definition files. |
Bootstrap |
- | Use normally. |
From |
FROM |
Use normally. |
%arguments |
ARG |
We can use build arguments to specify default software versions when changing the version does not require adding control flow to the build scripts. We can override default values using the --build-arg flag for the build command. |
%labels |
LABEL |
Add metadata to the container as name-value pairs. |
%files |
COPY |
We can add configuration files from the host to the container. However, we should download dependencies via the network in %post or RUN. |
%post |
RUN |
Use normally to run shell commands (/bin/sh by default) to build the container. |
%environment |
ENV |
Use to define runtime environment variables. The ENV directive applies during build time, but %environment applies only at runtime. Build-time environment variables on Apptainer should be defined in %post. |
%runscript, %startscript |
CMD, ENTRYPOINT |
Avoid using run scripts since scientific applications may have multiple ways to invoke the application from the command line. Instead, use apptainer exec to explicitly run commands with their arguments. |
| - | USER |
Do not use. It can lead to access permission issues. |
| - | SHELL |
Do not use. It is not part of the OCI specification. |
It is best to avoid other keywords to keep containers simple and easier to convert to OCI container definitions which we discuss later.
Inside the container, software is installed as the root user, therefore we don’t need to use the sudo command.
We should install all software to system directories typically to /usr/local or /opt and ensure that all installed files are world-readable.
The following table explains our options where to install software.
| Directory | Recommendation |
|---|---|
/usr |
Default directory where package managers install software. Executables and libraries are on the path by default. |
/usr/local |
We can install software to /usr/local. Executables and libraries are on the path by default. |
/opt |
We can install software to /opt but it requires manually setting paths correctly during linking, using environment variables or creating symbolic links to default locations. |
/tmp |
Use /tmp for temporary files during the build process and ensure these files are removed after the build completes. Apptainer mounts it at runtime by default. |
/home, /root |
Do not create files to the home directories. Apptainer mounts them at runtime by default. |
Given installation directory $PREFIX, the convention is to place executables to $PREFIX/bin directory, shared libraries to $PREFIX/lib directory, configurations $PREFIX/etc and headers to $PREFIX/include.
For more details about Linux file system convetions, see File Hierarchy Standard (FHS).
The examples will showcase building containers in more detail.
Running containers
We run commands within the container using the apptainer exec command as follows:
apptainer exec <flags> sciapp.sif <command> <arguments>
We can use --env flag to set environment variables and --cleanenv to avoid passing environment variables from the host.
For bind mounts, we can use --bind to bind mount directories and --no-home to disable binding home directory.
The container filesystem is read-only at runtime, therefore, make sure that your program does not attempt to write files to the container at runtime.
Instead, write files to the bind mounted directories with write permission.
Bind mounts have read and write permission by default when permissions are not defined explicitly.
Input data is read from and output is written into bind mounted directories.
Apptainer will bind mount certain directories by default such as the home directory ($HOME), current working directory and the temporary directory (/tmp).
Managing containers
We should place container definitions into a separate version-controlled repository instead of placing them to the same repository as the application source code. The separation makes the separation between the application source code and the container definitions explicit.
Example: Containerizing a scientific application
In the following examples, we demonstrate how to create and run a container for a small scientific application called sciapp.
We demonstrate the use of Apptainer, Docker, and Podman.
We install the dependencies required to run and build sciapp, and then we install sciapp itself by building it from the source.
We also show how to push and pull container images to a container registry, such as the GitHub Container Registry (GHCR).
Installing locally
Let’s start by cloning the repository and then changing our working directory to the cloned repository.
git clone https://github.com/jaantollander/sciapp
cd sciapp
Next, we can build the application, assuming that make and gcc are installed.
make
Let’s add the build directory to the PATH so we can call the application from the command line.
export PATH=$PWD/build:$PATH
Now, let’s create an input file named input.txt with the following lines:
1.0
2.0
3.0
We can then invoke the application using the following command:
sciapp input.txt output.txt
If everything worked correctly, the application will produce an output file named output.txt with the following content:
Average: 2.00
Next, let’s see how to containerize the application.
Containerizing with Apptainer
Let’s start by writing the following Apptainer definition to sciapp.def file:
Bootstrap: docker
From: ubuntu:22.04

%post
    # Install dependencies for building and running sciapp
    export DEBIAN_FRONTEND=noninteractive && \
    apt-get --yes update && \
    apt-get --yes upgrade && \
    apt-get --yes --no-install-recommends install \
        ca-certificates \
        curl \
        tar \
        gzip \
        bash \
        gcc \
        make \
        libc6-dev \
        && \
    apt-get --yes clean && \
    apt-get --yes autoremove && \
    rm -rf /var/lib/apt/lists/*

    # Install sciapp
    SCIAPP_VERSION=0.2.0 && \
    SCIAPP_URL=https://github.com/jaantollander/sciapp/archive/refs/tags/v${SCIAPP_VERSION}.tar.gz && \
    mkdir -p /tmp/build && \
    cd /tmp/build && \
    curl --location --output sciapp.tar.gz ${SCIAPP_URL} && \
    tar -xf sciapp.tar.gz && \
    cd sciapp-${SCIAPP_VERSION} && \
    make && \
    make install PREFIX=/usr/local && \
    cd / && \
    rm -rf /tmp/build
Next, we build the container as follows:
apptainer build sciapp.sif sciapp.def
Let’s run the containerized application and supply path to the input and output files as arguments as we did previously.
apptainer exec sciapp.sif sciapp input.txt output.txt
We can store Apptainer images to container registries that support ORAS such as GitHub Container Registry as follows:
apptainer registry login --username <username> oras://ghcr.io  # will prompt for an access token
apptainer push sciapp.sif oras://ghcr.io/<username>/sciapp:0.2.0
We can pull the container with Apptainer as follows:
apptainer pull sciapp.sif oras://ghcr.io/<username>/sciapp:0.2.0
In the next examples, we build Docker container and OCI container with Podman for the same application and convert it to Apptainer container.
Containerizing with Apptainer on a HPC cluster
We can building and running container on a HPC cluster that has Apptainer or Singularity instaleld and fakeroot enabled. The following is an example of building and running the previous Apptainer example on the CSC’s Puhti cluster.
We can build small container on the login node.
Large containers should be built on a Slurm job.
We should point Apptainer temporary directory to a location that has enough space such as fast local disk as the default value points to /tmp which may not have enough space on HPC clusters.
export APPTAINER_TMPDIR=$TMPDIR
apptainer build sciapp.sif sciapp.def
When running the container we need to bind mount cluster specific directories such as /users, /projappl and /scratch in Puhti if we want to use them.
apptainer exec \
    --bind /users --bind /projappl --bind /scratch \
    sciapp.sif sciapp input.txt output.txt
Containerizing with Docker
Let’s start by writing the following Dockerfile to sciapp.dockerfile file:
FROM ubuntu:22.04

# Install dependencies for building and running sciapp
RUN export DEBIAN_FRONTEND=noninteractive && \
    apt-get --yes update && \
    apt-get --yes upgrade && \
    apt-get --yes --no-install-recommends install \
        ca-certificates \
        curl \
        tar \
        gzip \
        bash \
        gcc \
        make \
        libc6-dev \
        && \
    apt-get --yes clean && \
    apt-get --yes autoremove && \
    rm -rf /var/lib/apt/lists/*

# Install sciapp
RUN SCIAPP_VERSION=0.2.0 && \
    SCIAPP_URL=https://github.com/jaantollander/sciapp/archive/refs/tags/v${SCIAPP_VERSION}.tar.gz && \
    mkdir -p /tmp/build && \
    cd /tmp/build && \
    curl --location --output sciapp.tar.gz ${SCIAPP_URL} && \
    tar -xf sciapp.tar.gz && \
    cd sciapp-${SCIAPP_VERSION} && \
    make && \
    make install PREFIX=/usr/local && \
    cd / && \
    rm -rf /tmp/build
Next, we build the container with Docker as follows:
docker build --tag localhost/sciapp:0.2.0 --file sciapp.dockerfile .
We can converting the Docker image into Apptainer image by saving the Docker image into an archive and building the Apptainer image from the archive as follows:
docker save --output sciapp.tar localhost/sciapp:0.2.0
apptainer build sciapp.sif docker-archive://sciapp.tar
Now, we can test that the container works as expected in the same way as in the Apptainer example.
Finally, we can push the container image to a container registry. For example, we can use GitHub Container Registry (GHCR) as follows:
docker login --username <username> ghcr.io  # will prompt for an access token
docker localhost/sciapp:0.2.0 ghcr.io/<username>/sciapp:0.2.0
docker push ghcr.io/<username>/sciapp:0.2.0
We can pull the container with Apptainer as follows:
apptainer pull sciapp.sif docker://ghcr.io/<username>/sciapp:0.2.0
Containerizing with Podman
We use the Dockerfile that we defined in the Docker example. We can build the container with Podman as follows:
podman build --tag localhost/sciapp:0.2.0 --file sciapp.dockerfile .
We can converting the OCI image into Apptainer image by saving the OCI image into an archive and building the Apptainer image from the archive as follows:
podman save --output sciapp.tar localhost/sciapp:0.2.0
apptainer build sciapp.sif docker-archive://sciapp.tar
Finally, we can push the container image to a container registry. For example, we can use GitHub Container Registry (GHCR) as follows:
podman login --username <username> ghcr.io  # will prompt for an access token
podman tag localhost/sciapp:0.2.0 ghcr.io/<username>/sciapp:0.2.0
podman push ghcr.io/<username>/sciapp:0.2.0
We can pull the container with Apptainer as follows:
apptainer pull sciapp.sif docker://ghcr.io/<username>/sciapp:0.2.0